Looking for a way to display your Shopify store's real-time sales data? The EleksCava-Shopify is an ESP32-powered E-Ink display that shows your daily sales, order counts, and more — right on your desk.
What is EleksCava-Shopify?
EleksCava-Shopify is a compact E-Ink sales display designed specifically for Shopify store owners. It connects to your store via the Shopify Admin API and displays real-time sales metrics on a low-power 2.9" E-Ink screen.
Key Features
| Feature | Description |
|---|---|
| Real-time Sales Display | Shows today's revenue and order count |
| Order Counter | Configurable timeframe (today, week, month, year, all-time) |
| New Order Alerts | Plays a notification sound when new orders come in |
| Auto Refresh Authentication | Uses Client ID and Client Secret to renew Shopify Admin API tokens on the device |
| Multi-Currency Support | Displays sales in your store's currency |
| Low Power Consumption | E-ink display only uses power when refreshing |
What You'll Need
- ✓ An EleksCava device
- ✓ Admin access to your Shopify store
- ✓ Access to Shopify Dev Dashboard for the same organization as your store
- ✓ A 2.4GHz Wi-Fi network (5GHz is not supported)
- ✓ A smartphone or computer for configuration
Create and Install a Shopify App
To display Shopify sales data, EleksCava needs Shopify Admin API access. The recommended v1.2.1 flow is Auto Refresh: create a Dev Dashboard app, install it on your own store, then enter the app's Client ID and Client Secret in the device portal. Manual Token mode is available only as a fallback.
Step 1: Create an App in Shopify Dev Dashboard
Start from Shopify's Dev Dashboard. The app must belong to the same Shopify organization as the store you want to connect:
- Open Shopify Admin → Settings → Apps and sales channels
- Follow Shopify's link to Dev Dashboard, or open Dev Dashboard directly
- Click Apps → Create app
- Choose Start from Dev Dashboard and enter a clear private name, such as
EleksCava Sales Display - Use this flow for stores you own. Apps for other merchants should use Shopify's normal app authentication flow instead.
Step 2: Configure Admin API Scopes and Release a Version
Create or edit an app version, then grant only the scopes the device needs:
- Open the app's Versions page
- Set the Admin API access scope read_orders
- Optional: add read_all_orders only if you need all-time counters that include orders older than Shopify's default order history window
- Save and Release the app version
Scope change rule
If you add scopes after installing the app, the store must approve the updated permissions again. Reinstall or re-approve the app before testing the device.
Step 3: Install the App to Your Store
The client credentials grant only works after the app is installed on the target store:
- Open the app's Overview or Home page
- Click Install app
- Select the Shopify store you want to connect
- Confirm that read_orders is listed, then approve the installation
Step 4: Copy Client ID and Client Secret
New Dev Dashboard apps do not show a permanent Admin API token in Shopify Admin. Instead, the app credentials request short-lived Admin API tokens when needed:
- Open the app's Settings page in Dev Dashboard
- Copy the Client ID from the Credentials section
- Use the reveal or copy button for Client Secret only when you are ready to configure the device
Do not copy the App automation token. Tokens that start with `atkn_` are for Shopify CLI / CI deployment and cannot read store Admin API data.
Step 5: Choose the Device Authentication Mode
Firmware v1.2.1 supports two modes. Use Auto Refresh unless you have a specific reason not to store the Client Secret on the device:
- Auto Refresh (recommended): enter Shop Domain, Client ID, and Client Secret in the device portal. The device exchanges them for an Admin API access token, stores the runtime token, and refreshes it before expiry or after a 401 response.
- Manual Token (fallback): run the token exchange on your computer, paste the returned
access_tokeninto the device portal, and repeat the script when the token expires. - Do not paste an App automation token. Tokens that start with
atkn_are for Shopify CLI / deployment automation and cannot read store Admin API data.
Step 6: Manual Token Fallback Scripts
Skip this step when using Auto Refresh. If you choose Manual Token, exchange the client credentials on your computer and paste only the returned `access_token` into EleksCava:
SHOPis only the part before.myshopify.com- Use
grant_type=client_credentials - A successful response contains
access_token,scope, andexpires_in - Confirm the returned scope includes read_orders
Mac / Linux / zsh
SHOP="your-store-subdomain"
CLIENT_ID="paste_client_id_here"
read -rs "CLIENT_SECRET?Client Secret: "
echo

HTTP_CODE=$(curl -sS -w "%{http_code}" \
  -o /tmp/shopify-token.json \
  -X POST "https://${SHOP}.myshopify.com/admin/oauth/access_token" \
  -H "Content-Type: application/x-www-form-urlencoded" \
  -H "Accept: application/json" \
  -d "grant_type=client_credentials" \
  --data-urlencode "client_id=${CLIENT_ID}" \
  --data-urlencode "client_secret=${CLIENT_SECRET}")

echo "HTTP ${HTTP_CODE}"
python3 - <<'PY'
import json
from pathlib import Path

path = Path("/tmp/shopify-token.json")
raw = path.read_text()
print(raw)

data = json.loads(raw)
token = data.get("access_token")
scopes = set((data.get("scope") or "").replace(" ", "").split(","))

print()
print("access_token:", token)
print("scope:", data.get("scope"))
print("expires_in:", data.get("expires_in"))

if not token:
    raise SystemExit("No access_token returned. Check HTTP code and error text.")
if "read_orders" not in scopes:
    raise SystemExit("Missing read_orders scope. Update app scopes and reinstall.")
PY
Windows / PowerShell
$Shop = "your-store-subdomain"
$ClientId = "paste_client_id_here"
$ClientSecretSecure = Read-Host "Client Secret" -AsSecureString
$Bstr = [Runtime.InteropServices.Marshal]::SecureStringToBSTR($ClientSecretSecure)

try {
    $ClientSecret = [Runtime.InteropServices.Marshal]::PtrToStringBSTR($Bstr)
    $Body = @{
        grant_type = "client_credentials"
        client_id = $ClientId
        client_secret = $ClientSecret
    }

    $Response = Invoke-RestMethod `
        -Method Post `
        -Uri "https://$Shop.myshopify.com/admin/oauth/access_token" `
        -ContentType "application/x-www-form-urlencoded" `
        -Body $Body

    Write-Host "HTTP 200"
    $Response | ConvertTo-Json
    $Response | ConvertTo-Json | Set-Content "$env:TEMP\shopify-token.json"

    if (-not $Response.access_token) {
        throw "No access_token returned."
    }
    $Scopes = ($Response.scope -replace " ", "") -split ","
    if ($Scopes -notcontains "read_orders") {
        throw "Missing read_orders scope. Update app scopes and reinstall."
    }
}
finally {
    if ($Bstr -ne [IntPtr]::Zero) {
        [Runtime.InteropServices.Marshal]::ZeroFreeBSTR($Bstr)
    }
}
Manual Token expires
Client credentials grant tokens expire after about 24 hours. Manual Token mode requires rerunning the script after expiry. Auto Refresh avoids this repeated user action by refreshing on the device.
Step 7: Prepare the Values for the EleksCava Portal
Record the exact values you will enter into the device configuration portal:
- Shop Domain:
your-store.myshopify.com(the full.myshopify.comdomain, not the admin URL) - Auto Refresh: Client ID and Client Secret from Dev Dashboard app Settings
- Manual Token: Only the
access_tokenreturned by the script above
The device portal never returns the saved Client Secret through its config API. If the secret is exposed, rotate it in the Shopify Dev Dashboard.
Success!
You now have the Shopify values needed by EleksCava.
How to Configure Wi-Fi on Your EleksCava Device
Before connecting to Shopify, your EleksCava device needs to join your Wi-Fi network.
Entering Configuration Mode
Your EleksCava enters AP (Access Point) mode automatically when:
- First power-on — No Wi-Fi has been configured yet
- Manual reset — Press and hold A + C buttons for 10 seconds
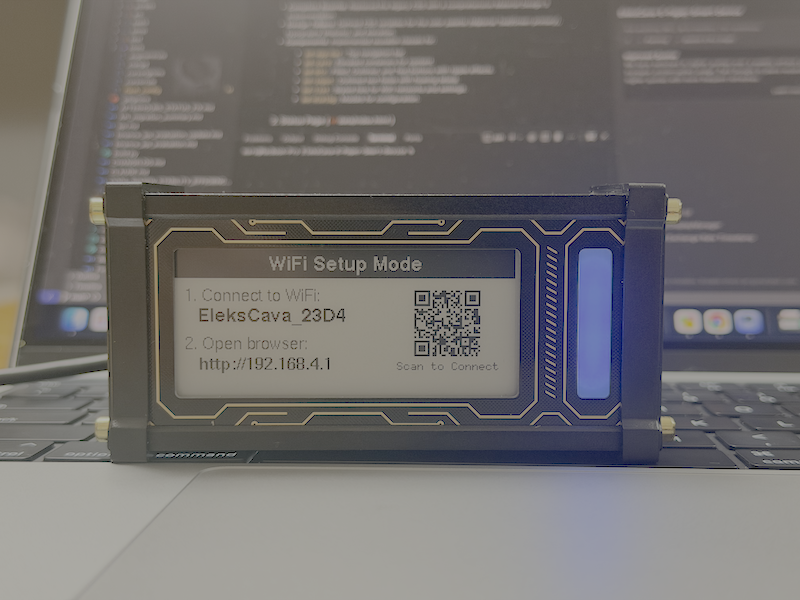
When in AP mode: the E-Ink screen displays a QR code and connection instructions, and the RGB LED pulses blue.
Step 1: Connect to the EleksCava Hotspot
- Open Wi-Fi settings on your phone or computer
- Look for a network named EleksCava-XXXX (XXXX is your device's unique ID)
- Connect to this network (no password required)
Step 2: Open the Configuration Page
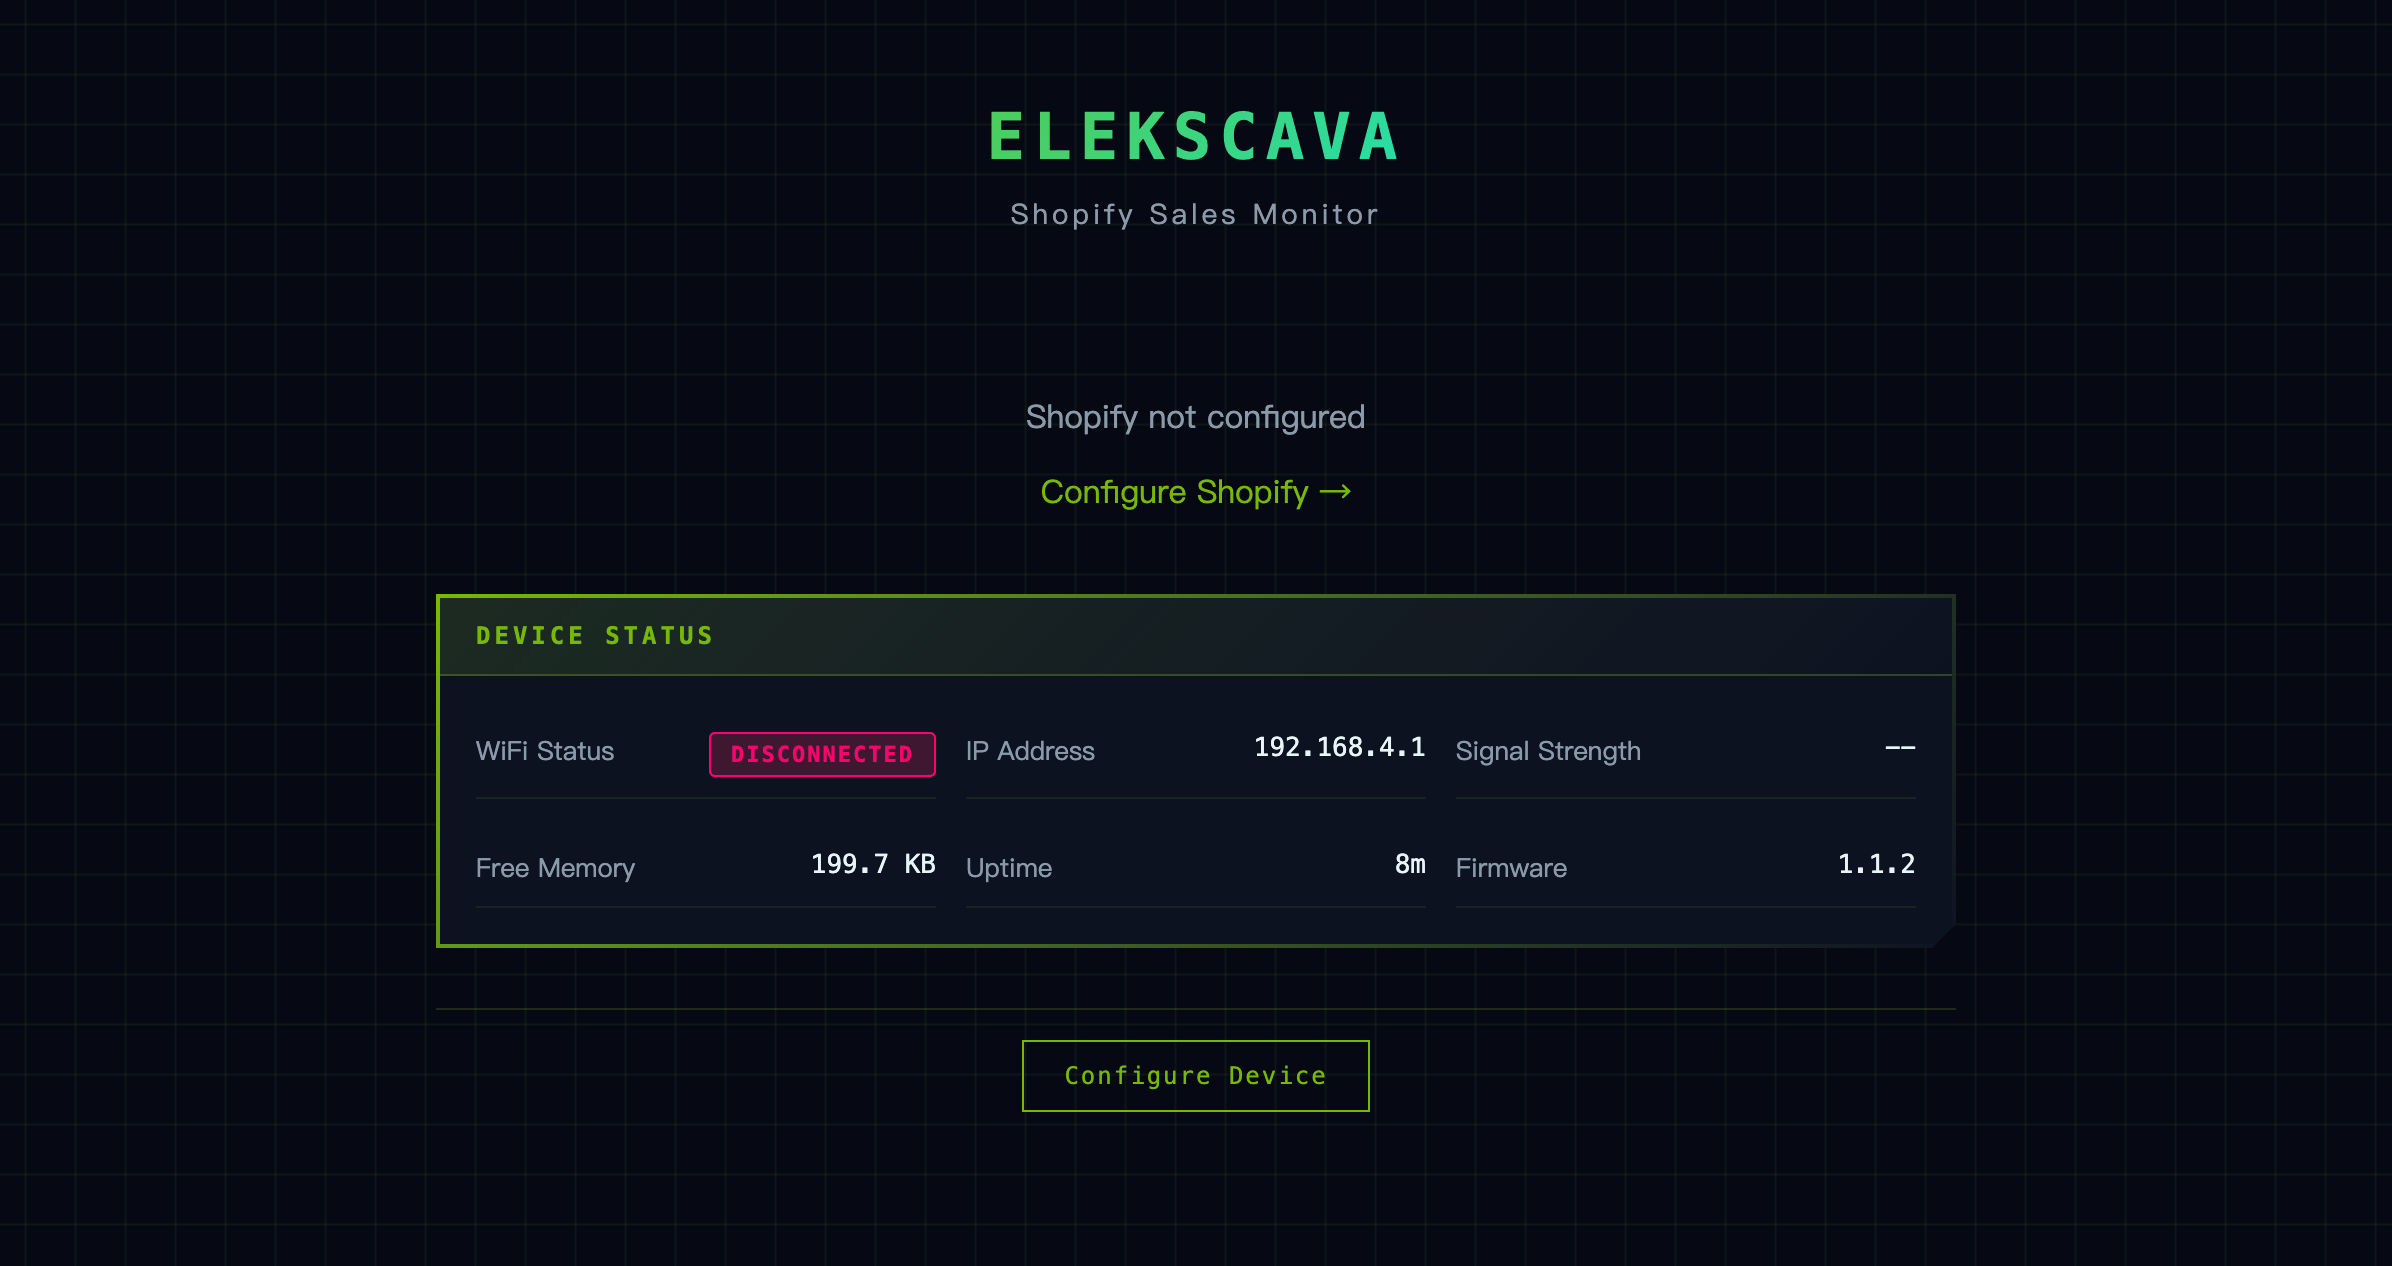
- Open any web browser
- Go to `http://192.168.4.1`
- Alternatively, scan the QR code shown on the device screen
Step 3: Connect to Your Wi-Fi Network
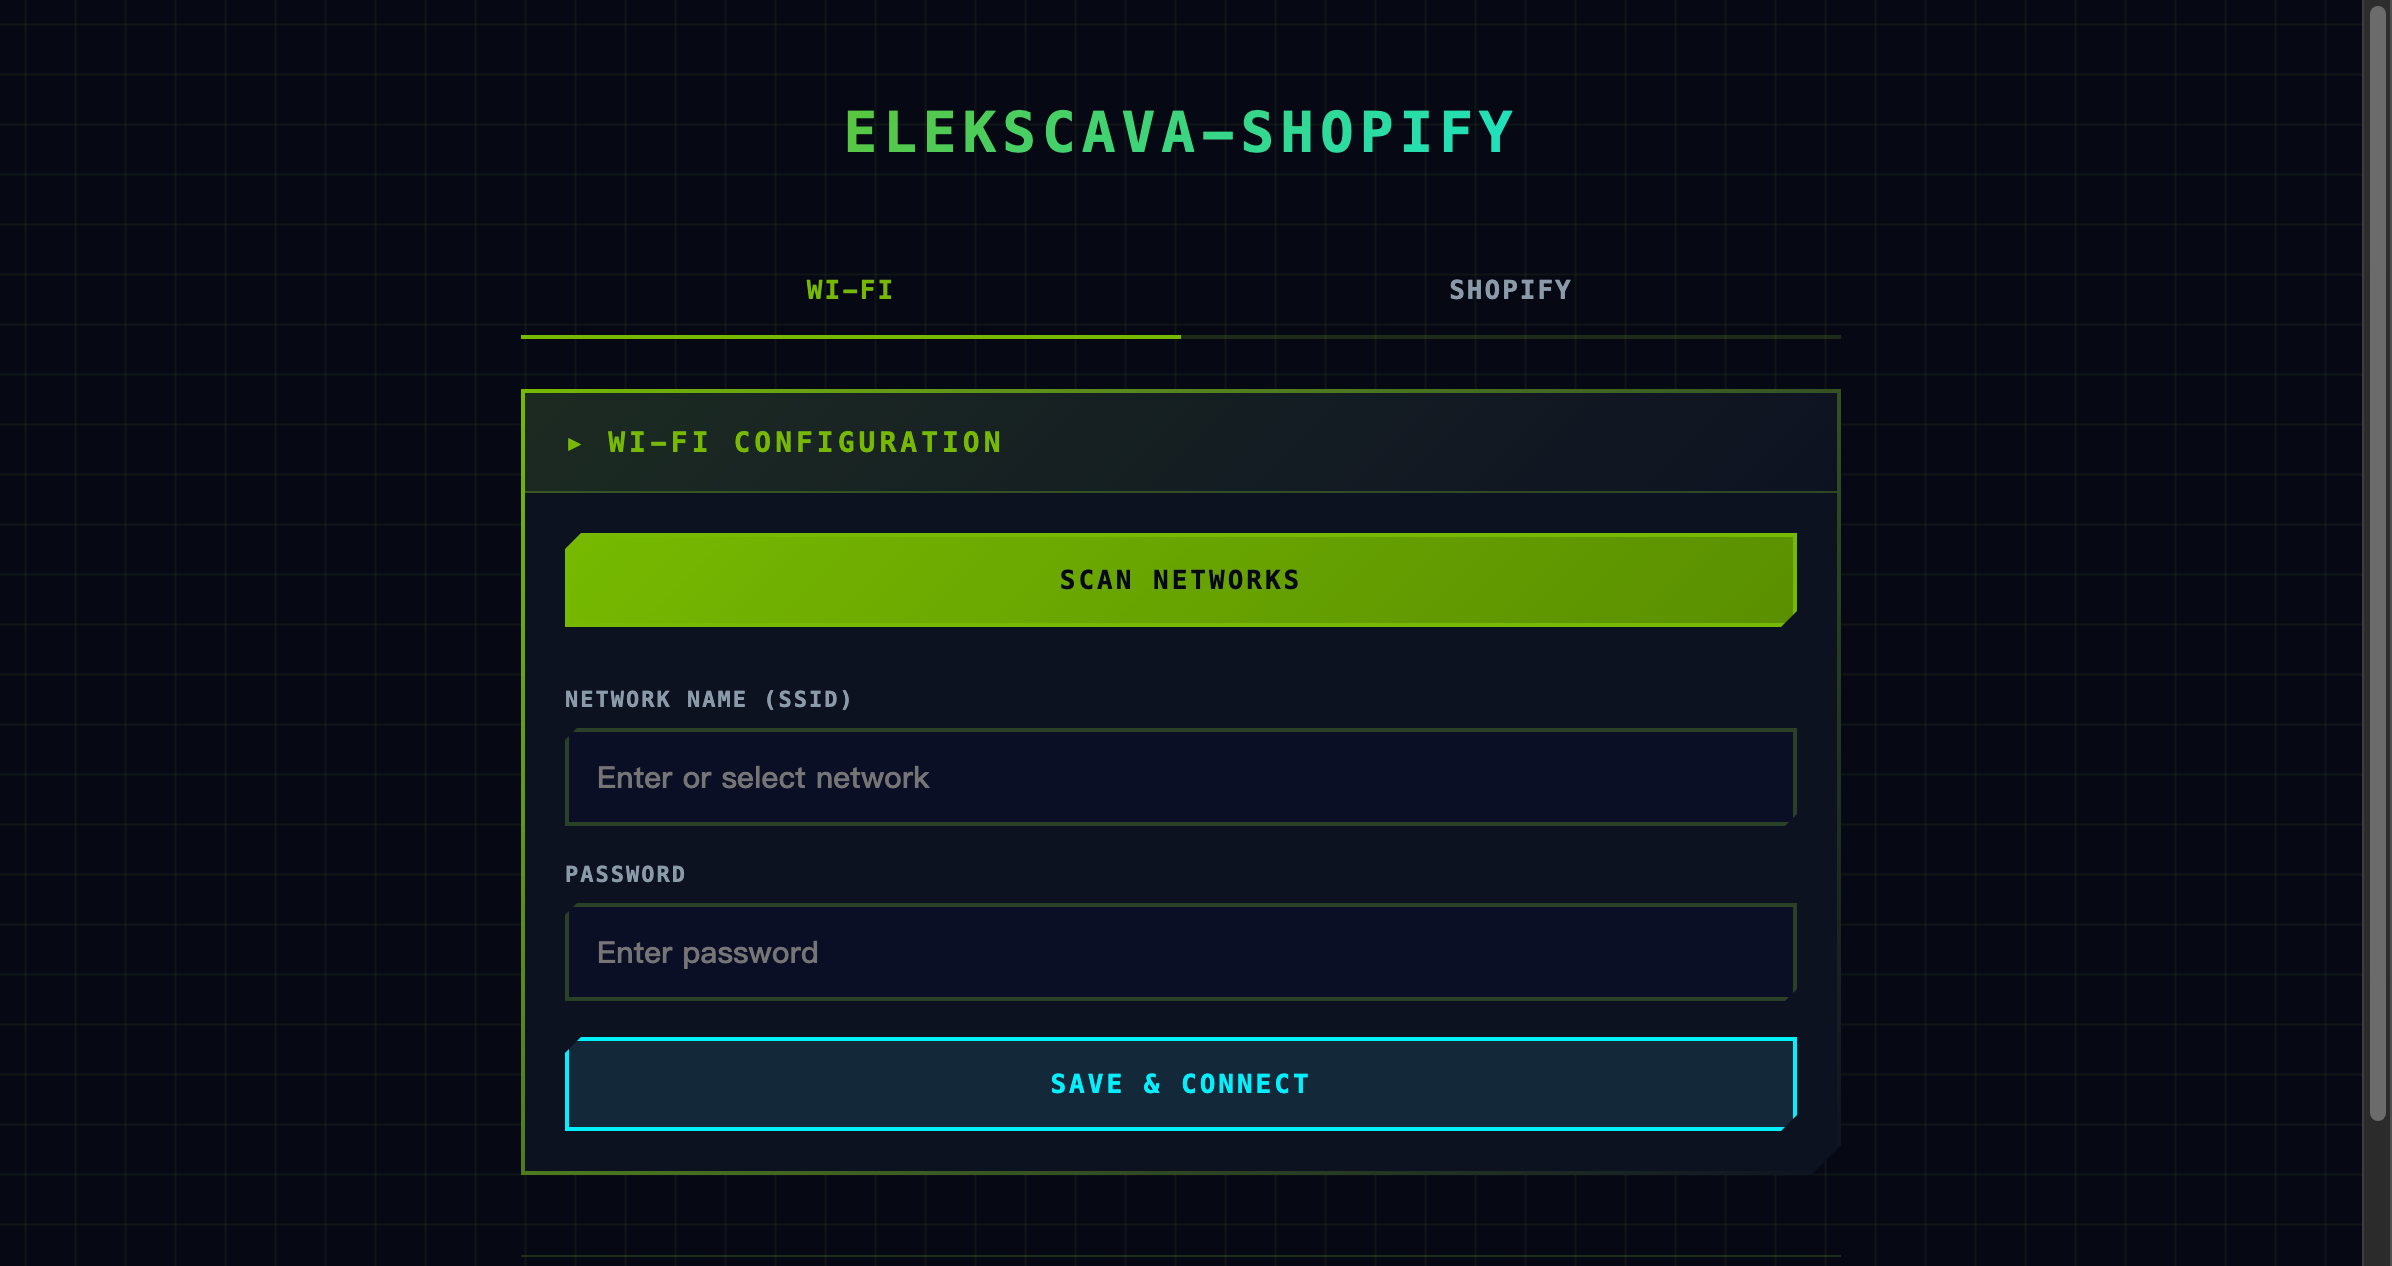
- Click Scan to search for nearby networks
- Select your Wi-Fi network from the list
- Enter your Wi-Fi password
- Click Connect
Note
EleksCava only supports 2.4GHz Wi-Fi networks. If you have a dual-band router, make sure to select the 2.4GHz network.
Step 4: Verify Connection
When successfully connected:
- Screen shows "Connected" with your device's new IP address
- RGB LED turns solid green
- Device plays a confirmation tone
Write down the IP address — you'll need it for the next section.
How to Connect EleksCava to Your Shopify Store
Now that your device is on Wi-Fi, enter the Shopify values from the previous section.
Step 1: Access the Device Configuration Page
- Ensure your phone/computer is on the same Wi-Fi network as EleksCava
- Open a browser and enter the device's IP address (e.g.,
http://192.168.1.105) - Click Configure or navigate to the Shopify settings section
Step 2: Enter Shopify Settings
In the Shopify section of the portal, fill in the fields for your selected authentication mode:
| Field | What to Enter | Example |
|---|---|---|
| Shop Domain | Your full Shopify store domain | your-store.myshopify.com |
| Authentication Mode | Recommended mode for v1.2.1 | Auto Refresh |
| Client ID | Required for Auto Refresh | From Dev Dashboard app Settings |
| Client Secret | Required for Auto Refresh; stored on the device and not returned by the config API | From Dev Dashboard app Settings |
| Admin API Access Token | Required only for Manual Token mode | Returned access_token, not atkn_... |
| Display Name | Short label shown on the E-Ink screen | My Store (max 14 characters) |
| Poll Interval | How often to refresh data (seconds) | 60 (recommended: 60-300) |
Step 3: Test the Connection
- Click Test Connection
- Wait a few seconds for the result
- Auto Refresh will request a fresh token during the test if needed
- You should see Connected and read_orders OK if everything is correct
- If the portal warns about the scope check, fix the app scopes before saving
If you see an error, check the FAQ section below.
Step 4: Save and Start Displaying Sales
- Click Save to store your configuration
- For Auto Refresh, the Client Secret field is cleared after saving and shown as configured
- The device will automatically fetch your sales data
- Your E-Ink display will update to show today's sales and orders
Congratulations!
Your EleksCava is now connected to your Shopify store!
Frequently Asked Questions
Why does "Test Connection" fail with HTTP 401 error?
Cause: The token is invalid, expired, or was created from credentials that no longer match the installed app.
Solution:
- For Auto Refresh, re-copy the current Client ID and Client Secret from Dev Dashboard app Settings
- For Manual Token, run the client credentials script again and paste the new
access_token - Do not paste an App automation token that starts with
atkn_ - Confirm the app has read_orders permission enabled
- Check that the app is installed on the target store
Why do I get HTTP 404 or Not Found when running the manual script?
Possible causes and solutions:
| Issue | Solution |
|---|---|
| Wrong shop subdomain | Set `SHOP` to only the part before `.myshopify.com`, for example `your-store-subdomain` |
| Using an admin URL | Do not include `admin.shopify.com/store/...`; use the store's `.myshopify.com` domain |
| App not installed on that store | Install the Dev Dashboard app on the exact store before requesting a token |
Why does the device reject an App automation token?
App automation tokens usually start with atkn_. They are for Shopify CLI / deployment automation and cannot call store Admin API endpoints. EleksCava needs either Auto Refresh credentials or a real Admin API access_token returned by the client credentials grant.
Why does Manual Token work today but fail tomorrow?
Client credentials grant tokens expire after about 24 hours. Use Auto Refresh for normal daily use, or rerun the manual script and paste the new access_token when the old token expires.
When do I need read_all_orders?
read_orders is enough for today's sales and recent order counters. Add read_all_orders only if you need all-time counters that include older order history, and only after Shopify allows that scope for your app.
Why won't my device connect to Wi-Fi?
Possible causes and solutions:
| Issue | Solution |
|---|---|
| Using 5GHz network | Switch to 2.4GHz Wi-Fi |
| Wrong password | Double-check your Wi-Fi password |
| Router blocking new devices | Check router's MAC filtering settings |
| Too far from router | Move device closer during setup |
Why does the display show $0 sales when I have orders?
This can happen for several reasons:
- Timezone mismatch — EleksCava uses your Shopify store's timezone. If your store is set to a different timezone, "today" might not match your local time.
- Order status filtering — Only orders with "paid" financial status are counted. Pending or refunded orders are excluded.
- Sync delay — Wait for the next poll interval (check your configured refresh rate).
How do I reset my EleksCava device?
Press and hold the A and C buttons simultaneously for 10 seconds. The device will:
- Clear all saved Wi-Fi credentials
- Clear Shopify configuration
- Restart in AP mode for fresh setup
What do the buttons do?
| Button | Action |
|---|---|
| A | Previous view (cycles through sub-screens in Sales mode) |
| B | Switch mode (Sales → Clock → Device Info → Sales) |
| C | Next view (cycles through sub-screens in Sales mode) |
| A + C (hold 10s) | Factory reset — enters AP configuration mode |
How often does the display update?
The display refreshes based on your configured Poll Interval (default: 60 seconds). The E-Ink screen only redraws when new data is received, which helps conserve power.
Need More Help?
If you're still experiencing issues after following this guide, please contact us:
Email: support@eleksmaker.co.jp
Please include your firmware version (visible on the Device Info screen) and a description of the issue.
Last updated: June 2026